您的购物车目前是空的!
Vultr 安装配置btlike BT搜索引擎 图文教程
前面我们写了手撕包菜SSBC(DHT磁力链源码) 2016.8月版 安装图文教程。但是SSBC非常占用资源,容易跑死。有位网友过来找我们希望写一个btlike的安装教程。
btlike官网:http://btlike.com/
Table of Contents
特性
- 高性能单核,768MB的VPS上,每秒处理UDP请求超过12K,内存占用不超过100MB
- 大容量采用Mysql分表存储,设计容量6千万~8千万数据
- 全文搜索采用Elasticsearch现全文索引和热度排序
环境:
Vultr 充5美元可以用5个月VPS 充值最高送100美元
Vultr 15 GB SSD$5/mo$0.007/h1 CPU768MB Memory1000GB Bandwidth
系统:Centos6 X64
btlike目录结构:
├── api 对外提供API服务 │ ├── api 可执行文件 │ └── config 配置文件 │ └── api.conf ├── crawl 抓取活跃infohash于metadata │ ├── config 配置文件 │ │ └── crawl.conf │ └── crawl 可执行文件 ├── site 网站前端代码,作者已删除,请移步:BTLIKE PHP前端页面 安装下载 图文教程 └── storage 从资源库抓取资源(xunlei) ├── config 配置文件 │?? └── storage.conf └── storage 可执行文件
详细步骤:
更新系统到最新,关闭iptables防火墙,安装go等组件
yum update -y;/etc/init.d/iptables stop; yum install go git gcc screen git unzip java-1.8.0-openjdk* -y本人对Java没有研究,所以这里不管,全部包安装好
切换到screen:
screen -S jinstall安装mariadb
yum install MariaDB-server MariaDB-client -y /etc/init.d/mysql start #启动MariaDB服务,因为它是mysql的分支,所以一些命令还是相同的。运行请添加MariaDB官方源:CentOS 5, CentOS 6, CentOS 7, RHEL 5, RHEL 6, RHEL 7, and Fedora 21 yum 安装 MariaDB 图文教程,否则会出现如下错误:
yum search mariadbLoaded plugins: fastestmirror
Loading mirror speeds from cached hostfile
* base: mirror.supremebytes.com
* epel: mirrors.kernel.org
* extras: mirrors.kernel.org
* updates: mirror.supremebytes.com
Warning: No matches found for: mariadb
No Matches found
初始化MariaDB的root密码:
mysql -uroot -p //下一步输入密码时,直接回车即可。默认是空密码Enter password: Welcome to the MariaDB monitor. Commands end with ; or g. Your MariaDB connection id is 3 Server version: 10.1.16-MariaDB MariaDB Server Copyright (c) 2000, 2016, Oracle, MariaDB Corporation Ab and others. Type 'help;' or 'h' for help. Type 'c' to clear the current input statement. MariaDB [(none)]> use mysql; //切换到mysql数据库 Reading table information for completion of table and column names You can turn off this feature to get a quicker startup with -A Database changed MariaDB [mysql]> update user set password=PASSWORD('新密码') where user='root'; //重设密码 Query OK, 4 rows affected (0.01 sec) Rows matched: 4 Changed: 4 Warnings: 0 MariaDB [mysql]> flush privileges; //权限生效 Query OK, 0 rows affected (0.00 sec) MariaDB [mysql]> create database torrent default character set utf8; //创建torrent表 Query OK, 1 row affected (0.00 sec) MariaDB [mysql]> q Bye
创建切换文件夹:
mkdir /wwwroot/jiloc.com -p初始化Go:
mkdir ~/.go echo "GOPATH=$HOME/.go" >> ~/.bashrc echo "export GOPATH" >> ~/.bashrc echo "PATH=$PATH:$GOPATH/bin # Add GOPATH/bin to PATH for scripting" >> ~/.bashrc source ~/.bashrc go get -v github.com/btlike/repositorygo get -v (-v 参数显示状态进度)
直接运行可能会找不到路径:
go get github.com/btlike/repositorypackage github.com/btlike/repository: cannot download, $GOPATH not set. For more details see: go help gopath
导入sql文件到数据库中:
mysql -uroot -p数据库密码 torrent --default-character-set=utf8 < /root/.go/src/github.com/btlike/repository/mysql.sql安装Elasticsearch:
ES的官方网站上有说明:
https://www.elastic.co/guide/en/elasticsearch/reference/current/setup-repositories.html
首先下载并安装公钥
rpm --import https://packages.elastic.co/GPG-KEY-elasticsearch配置一下yum源
vi /etc/yum.repos.d/elasticsearch.repoelasticsearch.repo内容:
[elasticsearch-2.x] name=Elasticsearch repository for 2.x packages baseurl=http://packages.elastic.co/elasticsearch/2.x/centos gpgcheck=1 gpgkey=http://packages.elastic.co/GPG-KEY-elasticsearch enabled=1
然后更新一下缓存
yum makecache安装elasticsearch
yum install elasticsearch -y安装elasticsearch完毕。
添加elasticsearch服务:
之后我们需要将ElasticSearch作为一个服务来运行,具体参考这里
https://www.elastic.co/guide/en/elasticsearch/reference/current/setup-service.html
chkconfig --add elasticsearch service elasticsearch start至此为止,elasticsearch服务就启动了,访问一下9200端口
curl -X GET localhost:9200# curl -X GET localhost:9200
{
“name” : “Lady Killer”,
“cluster_name” : “elasticsearch”,
“version” : {
“number” : “2.3.5”,
“build_hash” : “90f439ff60a3c0f497f91663701e64ccd01edbb4”,
“build_timestamp” : “2016-07-27T10:36:52Z”,
“build_snapshot” : false,
“lucene_version” : “5.5.0”
},
“tagline” : “You Know, for Search”
}
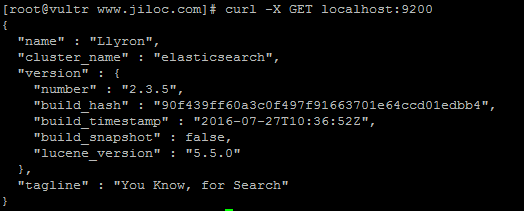
如果能看到这个内容说明elasticsearch服务已经成功安装。
下载btlike主程序:
wget http://obu2kw0g0.bkt.clouddn.com/linux_amd64.zip ; unzip linux_amd64.zip ; cp linux_amd64/* /wwwroot/jiloc.com/ -R编辑配置文件,修改一下数据库的密码,红色部分:
vi /wwwroot/jiloc.com/api/config/api.conf{ "database":"数据库用户名:数据库密码@tcp(127.0.0.1:3306)/数据库名?charset=utf8&parseTime=True&loc=Local", "elastic":"http://127.0.0.1:9200", "address":":8088" }
同样需要配置的还有,同样是修改数据库密码
/wwwroot/jiloc.com/storage/config/storage.conf /wwwroot/jiloc.com/crawl/config/crawl.conf
可以使用批量替换方法,linux shell 命令行 批量替换 一键命令:
sed -i "s/root:password/root:新密码/g" `grep -lr 'root:password'?/wwwroot/jiloc.com/`运行脚本,下面的脚本是在后台运行,大家也可使用screen等方式放入后台
- nohup 模式
crawl
cd /wwwroot/jiloc.com/crawl/ ; nohup ./crawl >> /dev/null 2>&1 &
api
cd /wwwroot/jiloc.com/api/ ; nohup ./api >> /dev/null 2>&1 &
storage
cd /wwwroot/jiloc.com/storage/ ; nohup ./storage >> /dev/null 2>&1 &
- screen 模式
crawl :
cd /wwwroot/jiloc.com/crawl/ screen -S crawl ./crawl CTRL+A,D退出screen
其他的同理
nohup、screen模式二选一即可。
安装配置nginx
yum install nginx
vi /etc/nginx/conf.d/jiloc.com.conf //编辑nginx配置文件,添加如下内容
server { listen 80 ; server_name jiloc.com; #这里是绑定的域名 location / { root /wwwroot/jiloc.com/; #修改这里文件位置 index index.html index.htm; } #PHP部分 location ~ .php$ { fastcgi_pass 127.0.0.1:9000; fastcgi_index index.php; fastcgi_param SCRIPT_FILENAME $document_root$fastcgi_script_name; include fastcgi_params; } }
保存文件。
nginx -t //测试一下配置文件是不是有问题,如果没有问题的话重启nginx访问即可! /etc/init.d/nginx restart
作者已将前端 site 文件夹删除,可以使用我们的PHP前端。
下面我们要继续安装PHP环境:
yum install -y php-fpm php-pdo php-mysql /etc/init.d/php-fpm restart echo '<?php phpinfo();'>/wwwroot/jiloc.com/Info.php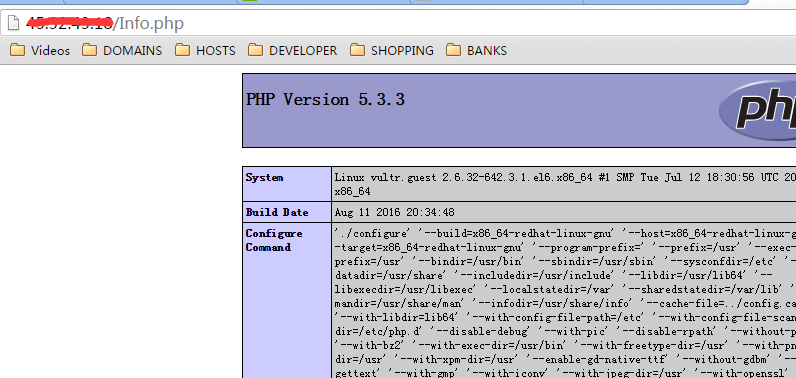
下面我们访问一下http://域名/Info.php
也可以看到phpinfo信息:
下载PHP前端代码:
git clone https://github.com/qsbaq/btlike-php-front.gitInitialized empty Git repository in /wwwroot/jiloc.com/btlike-php-front/.git/
remote: Counting objects: 65, done.
remote: Compressing objects: 100% (50/50), done.
remote: Total 65 (delta 23), reused 39 (delta 11), pack-reused 0
Unpacking objects: 100% (65/65), done.
修改nginx的文件夹位置:
vi /etc/nginx/conf.d/jiloc.com.conf将上面粉色标注的文件夹位置
root /wwwroot/jiloc.com/; #修改这里文件位置
修改为:
root /wwwroot/jiloc.com/btlike-php-front/;
保存。
nginx -t //测试一下配置文件是不是有问题,如果没有问题的话重启nginx访问即可! /etc/init.d/nginx restart
继续完成PHP文件配置,请移步:BTLIKE PHP前端页 下载 安装图文教程
常见问题合集:
- 爬虫出现 go/golang ?too many open files error 怎么办?
- spider.go:54: elastic: Error 429 (Too Many Requests): rejected execution of [email protected] on EsThreadPoolExecutor[index, queue capacity = 200, [email protected]bf9568[Running, pool size = 4, active threads = 4, queued tasks = 200, completed tasks = 30940]] [type=es_rejected_execution_exception]
vi /etc/security/limits.conf #最后添加
* soft nofile 1024000
* hard nofile 1024000
hive – nofile 1024000
hive – nproc 1024000
- MariaDB出现Too Many Connections 怎么办?
vi /etc/my.cnf.d/server.cnf #在[mysqld]段中添加max_connections[mysqld] max_connections=4086
以下部分已不失效不用修改!!!
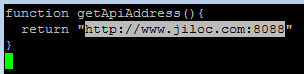
修改API地址:
vi /wwwroot/jiloc.com/site/assets/js/core.js把:
function getApiAddress(){ return "http://api.btlike.com" }
修改成:
function getApiAddress(){ return "https://jiloc.com:8088" //这里改成自己的域名:8088 ,端口即可。 }
教程完毕!! 下面即可通过绑定的域名使用浏览器访问啦!