您的购物车目前是空的!
BTLike Golang爬虫 LNMP面板 PHP前端 完整图文教程
前面我们写了Vultr 安装配置btlike BT搜索引擎 图文教程,但是作者的原生前端不太适合SEO,我们老季重新适配了前端,BTLIKE PHP前端页面 安装下载 图文教程。
群里一些网友不知道怎么配合,所以我们现在重新写一个LNMP面板+BTLike的GO爬虫的完整教程。
Table of Contents
环境:
Vultr 充5美元可以用5个月VPS 充值最高送100美元
Vultr 15 GB SSD$5/mo$0.007/h1 CPU768MB Memory1000GB Bandwidth
系统:Centos7
这里感谢一下群友赞助的机器写此教程~
使用putty或类似的SSH工具登陆VPS或服务器。
具体步骤:
更新系统,安装依赖等。
yum install screen -y screen -S jinstall yum update -y #更新系统命令,也可以不更新系统,不影响使用 systemctl stop iptables.serivce #关闭防火墙 systemctl stop firewalld.service #停止firewall setenforce 0 #关闭SELINUX yum install go git gcc git unzip java-1.8.0-openjdk* -y安装LNMP
这里就不给出具体步骤,请查看官网教程:http://lnmp.org/install.html
设置的mysql的密码是:laoji.org
数据库使用默认,PHP我们这里使用的是6 : 7.0X 版本
============================== Check install ==============================
Checking …
Nginx: OK
MySQL: OK
PHP: OK
PHP-FPM: OK
Clean src directory…
+————————————————————————+
| LNMP V1.3 for CentOS Linux Server, Written by Licess |
+————————————————————————+
| For more information please visit http://www.lnmp.org |
+————————————————————————+
| lnmp status manage: lnmp {start|stop|reload|restart|kill|status} |
+————————————————————————+
| phpMyAdmin: http://IP/phpmyadmin/ |
| phpinfo: http://IP/phpinfo.php |
| Prober: http://IP/p.php |
+————————————————————————+
| Add VirtualHost: lnmp vhost add |
+————————————————————————+
| Default directory: /home/wwwroot/default |
+————————————————————————+
| MySQL/MariaDB root password: laoji.org |
+————————————————————————+
+——————————————-+
| Manager for LNMP, Written by Licess |
+——————————————-+
| http://lnmp.org |
+——————————————-+
nginx (pid 23654 23652) is running…
php-fpm is runing!
SUCCESS! MySQL running (24183)
Active Internet connections (only servers)
Proto Recv-Q Send-Q Local Address Foreign Address State
tcp 0 0 0.0.0.0:3306 0.0.0.0:* LISTEN
tcp 0 0 0.0.0.0:80 0.0.0.0:* LISTEN
tcp 0 0 0.0.0.0:22 0.0.0.0:* LISTEN
tcp6 0 0 :::22 :::* LISTEN
Install lnmp V1.3 completed! enjoy it.
安装配置Go环境
yum install go -y默认这里已经安装好了。
echo "GOPATH=/var/run/go" >> ~/.bashrc echo "export GOPATH" >> ~/.bashrc echo "PATH=$PATH:$GOPATH/bin # Add GOPATH/bin to PATH for scripting" >> ~/.bashrc source ~/.bashrc go get -v github.com/btlike/repository安装Elasticsearch:
ES的官方网站上有说明:
https://www.elastic.co/guide/en/elasticsearch/reference/current/setup-repositories.html
首先下载并安装公钥
rpm --import https://packages.elastic.co/GPG-KEY-elasticsearch配置一下yum源
vi /etc/yum.repos.d/elasticsearch.repoelasticsearch.repo内容:
[elasticsearch-2.x] name=Elasticsearch repository for 2.x packages baseurl=http://packages.elastic.co/elasticsearch/2.x/centos gpgcheck=1 gpgkey=http://packages.elastic.co/GPG-KEY-elasticsearch enabled=1然后更新一下缓存
yum makecache安装elasticsearch
yum install elasticsearch -y安装elasticsearch完毕。
之后我们需要将ElasticSearch作为一个服务来运行,具体参考这里
https://www.elastic.co/guide/en/elasticsearch/reference/current/setup-service.html
chkconfig --add elasticsearch service elasticsearch start至此为止,elasticsearch服务就启动了,访问一下9200端口
curl -X GET localhost:9200# curl -X GET localhost:9200
{
“name” : “Lady Killer”,
“cluster_name” : “elasticsearch”,
“version” : {
“number” : “2.3.5”,
“build_hash” : “90f439ff60a3c0f497f91663701e64ccd01edbb4”,
“build_timestamp” : “2016-07-27T10:36:52Z”,
“build_snapshot” : false,
“lucene_version” : “5.5.0”
},
“tagline” : “You Know, for Search”
}
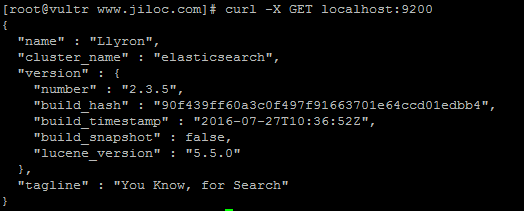
如果能看到这个内容说明elasticsearch服务已经成功安装。
配置数据库:
浏览器打开:http://IP/phpmyadmin
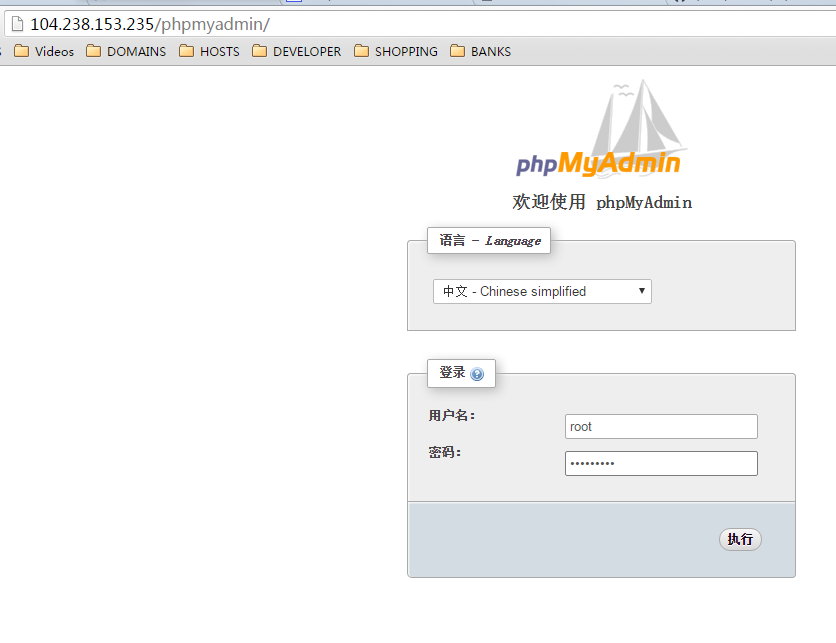
创建名为:torrent 的数据库,使用utf8_general_ci编码

下载主程序:
cd /root ; wget http://obu2kw0g0.bkt.clouddn.com/linux_amd64.zip ; unzip linux_amd64.zip替换数据库密码:
sed -i "s/root:password/root:laoji.org/g" `grep -lr 'root:password' /root/linux_amd64/`导入数据mysql.go ,也可从phpmyadmin导入
mysql -uroot -p数据库密码 torrent --default-character-set=utf8 < /var/run/go/src/github.com/btlike/repository/mysql.sql运行Go服务,一共3个(storage,api,craw),我们这里以crawl为例
screen -S crawl cd linux_amd64/crawl/ CTRL+A,D #后台运行程序,并退出screen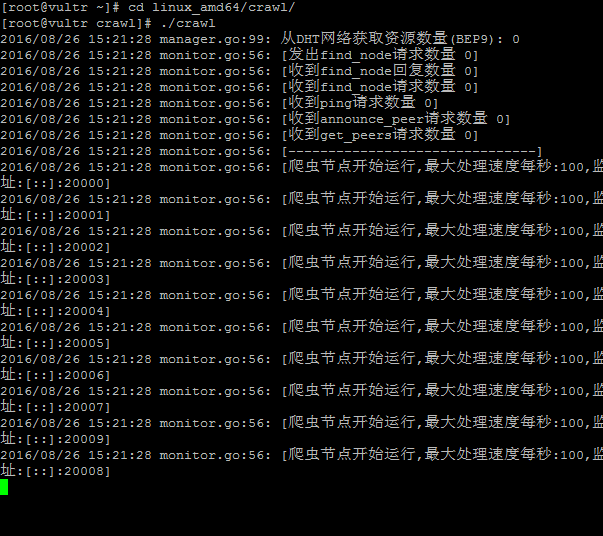
将终端放入后台运行即可,切勿关闭。
添加虚拟主机
官网教程:http://lnmp.org/faq/lnmp-vhost-add-howto.html
================================================
Virtualhost infomation:
Your domain: laoji.org
Home Directory: /home/wwwroot/laoji.org #这里是我们选择的安装目录
Rewrite: other
Enable log: yes
Create database: no
Create ftp account: no
================================================
cd /home/wwwroot/laoji.org git clone https://github.com/qsbaq/btlike-php-front.git cp btlike-php-front/* /home/wwwroot/laoji.org/ -R && rm /home/wwwroot/laoji.org/btlike-php-front/ -rf cp config.sample.php config.php编辑config.php中的数据库名密码等选项.
具体配置及更新等请移步:BTLIKE PHP前端页面 安装下载 图文教程
完成后即可使用域名访问网站 http://laoji.org
教程到这里就结束了,如果有什么疑问可以留言或者加群提问。